There is nothing quite like a classic Southern dessert to bring a smile to everyone's face. Growing up in Nashville, our family gatherings always ended with something sweet. It was usually a homemade treat, lovingly prepared right in Mama's kitchen. Those memories of sweet aromas filling the air are truly precious to me. We often gathered around the table, sharing stories and laughter over a slice of something wonderful.
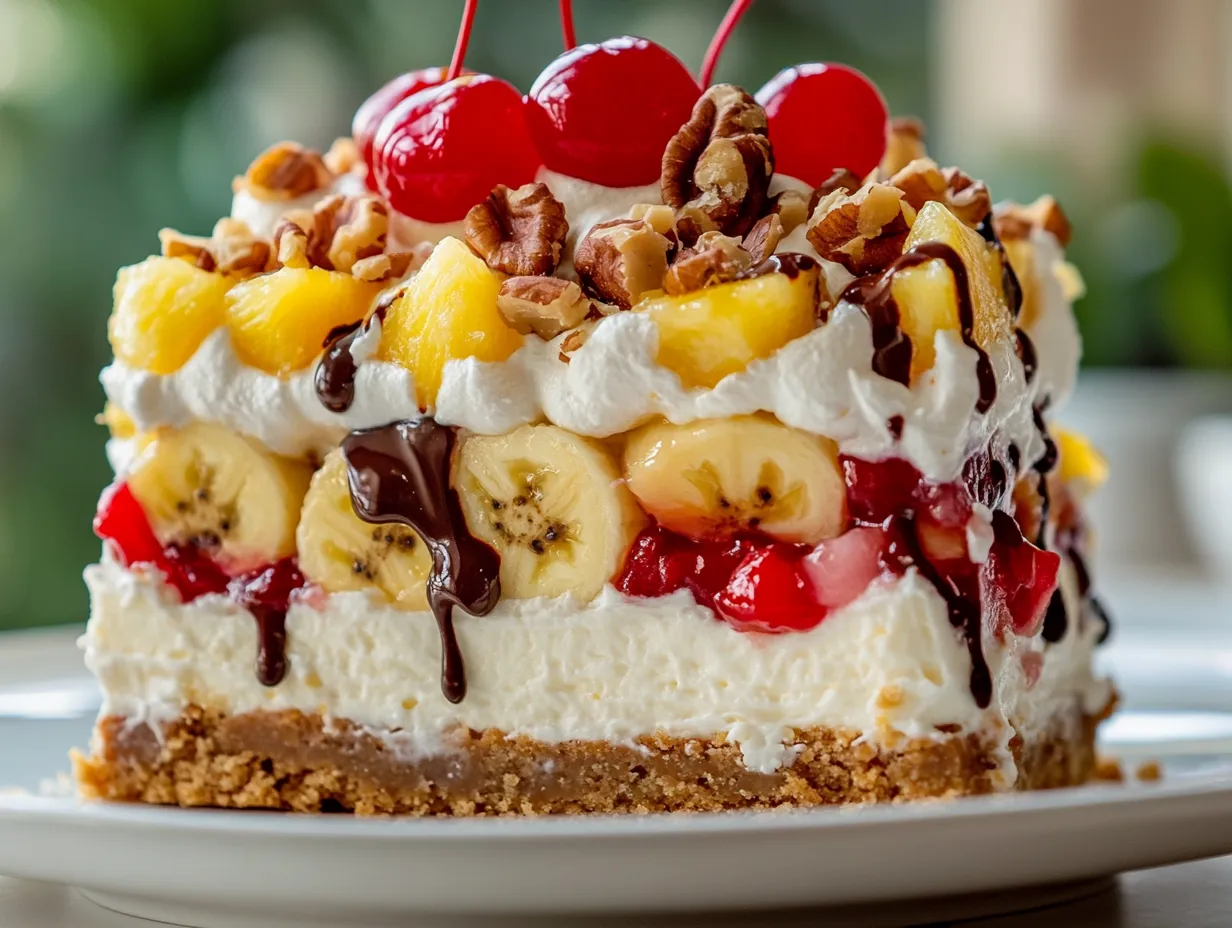
Today, I am thrilled to share a recipe that captures that same joyful spirit without needing an oven. This No-Bake Banana Split Dessert is an absolute dream come true. It is incredibly easy to assemble, yet it delivers a spectacular presentation and flavor. Imagine layers of creamy goodness, fresh fruit, and a crunchy graham cracker crust. It is a showstopper without all the fuss.
This dessert is a delightful nod to the beloved banana split, transformed into a simple, shareable square. It is perfect for summer potlucks, backyard barbecues, or any time you crave a sweet, refreshing escape. The rich flavors and varied textures make every single bite an adventure. You will love how quickly it comes together, leaving you more time to enjoy your loved ones.
My grandmother first introduced me to a version of this dish. She always knew how to make something special from everyday ingredients. This recipe carries on her legacy of simple, delicious, and heartwarming food. It truly embodies the CrispFork philosophy of easy, crispy, Southern-inspired recipes for your family. This dessert is sure to become a cherished family favorite in your home too.
Essential Ingredients for Your No-Bake Banana Split
Gathering your ingredients is the first exciting step toward creating this magnificent dessert. Each component plays a vital role in building those irresistible layers of flavor and texture. You will find everything you need easily at your local grocery store.
- 2 cups graham cracker crumbs
- 1/2 cup melted butter
- 1/4 cup granulated sugar
- 2 (8 oz) blocks cream cheese, softened
- 1 cup powdered sugar
- 1 teaspoon vanilla extract
- 1 (8 oz) whipped topping (like Cool Whip)
- 3–4 bananas, sliced (slightly firm works best)
- 1 (20 oz) can crushed pineapple, very well drained
- 1 cup strawberry pie filling or mashed sweetened strawberries
- 1–2 cups whipped topping
- Chocolate syrup (for drizzling)
- 1/2 cup chopped peanuts or walnuts
- Maraschino cherries
Cream Cheese: Always use full-fat cream cheese for the best, most luxurious texture in your cream layer. Make sure it is completely softened to room temperature. This prevents lumps and ensures a smooth, creamy filling. Cold cream cheese will result in a clumpy, difficult-to-spread mixture. Take it out of the refrigerator at least an hour before you start baking.
Bananas: Choose bananas that are slightly firm, not overly ripe. Overripe bananas will get too mushy when sliced and can brown quickly. Look for bananas that are yellow with just a hint of green at the ends. This ensures they hold their shape and offer a pleasant texture. They are the star of the show.
Crushed Pineapple: The key here is "very well drained." Excess liquid from the pineapple can make your dessert watery and soggy. Press out as much moisture as possible using a fine-mesh sieve or paper towels. This step is critical for a firm, delicious dessert. Do not skip this important part.
Crafting Your Easy Banana Split Dessert Layers
Let's dive into creating this delightful dessert. The process is straightforward and fun, making it perfect for cooks of all skill levels. Just follow these steps, and you will have a stunning treat ready to chill.
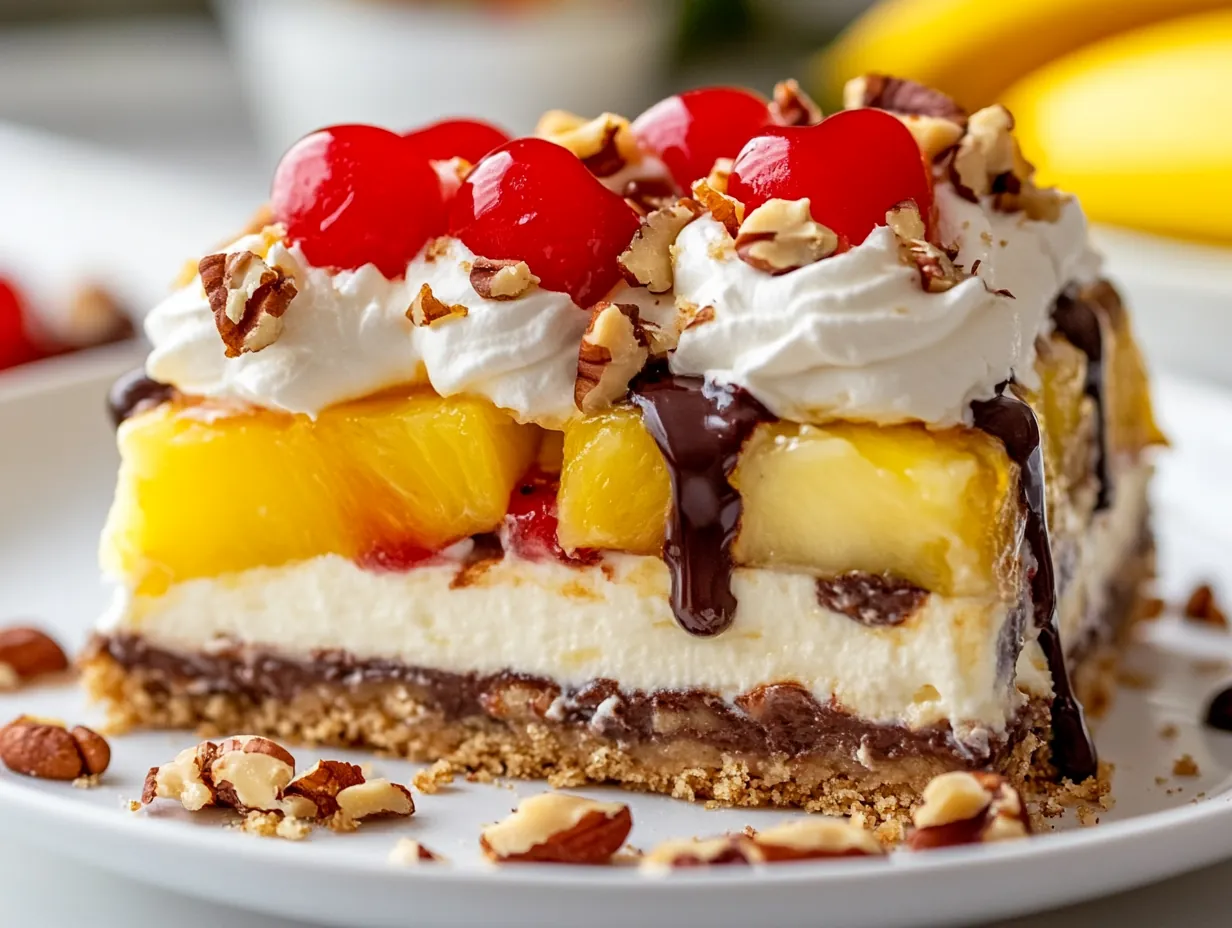
- Prepare the Crust: In a bowl, mix graham cracker crumbs, melted butter, and sugar until evenly combined. The texture should resemble damp sand. Press the mixture firmly into a 9×13-inch glass dish, making sure it’s even and compact, especially in the corners. Chill in the refrigerator for 20–30 minutes until set.
- Make the Cream Layer: In a large mixing bowl, beat the softened cream cheese until completely smooth and free of lumps. Add powdered sugar and vanilla extract, then mix until creamy. Gently fold in the whipped topping until light and fluffy.
- Assemble the Base Layers: Spread the cream mixture evenly over the chilled crust. Take your time to smooth it out without disturbing the crust underneath.
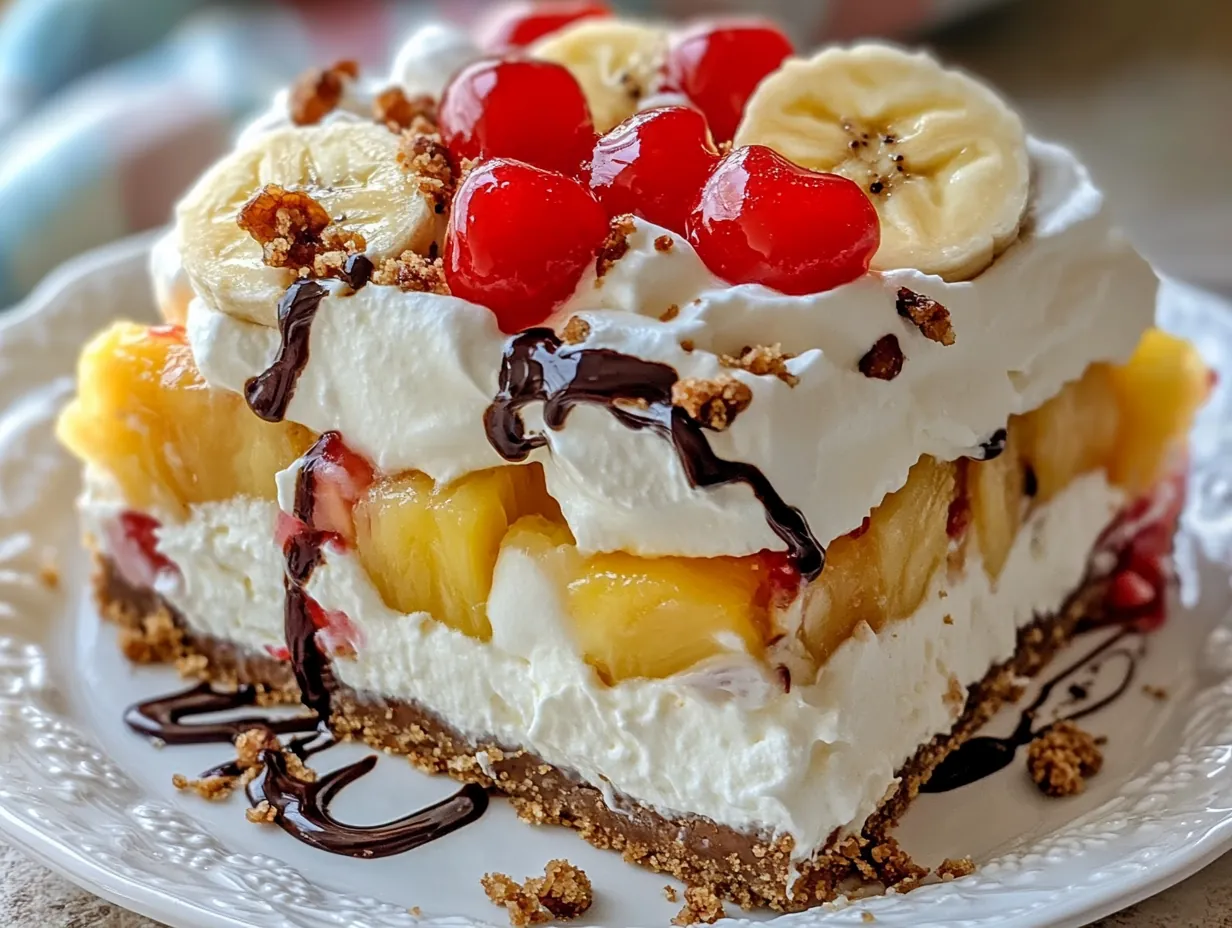
- Add the Banana Layer: Arrange banana slices along the edges of the dish first (this creates that pretty layered look when sliced), then spread the remaining slices evenly across the surface.
- Add Pineapple Layer: Spread the well-drained crushed pineapple evenly over the bananas. Avoid pressing too hard to keep layers intact.
- Add Strawberry Layer: Spoon and spread the strawberry filling over the pineapple layer. Keep it even but don’t overmix the layers.
- Top It Off: Spread a thick layer of whipped topping across the entire dessert. Drizzle generously with chocolate syrup, sprinkle chopped nuts, and place cherries evenly across the top.
- Chill and Set: Refrigerate for at least 4 hours, but overnight is best for clean slices and fully set layers.
- Serve Cold: Slice into squares and serve chilled. Use a clean knife between cuts for neat layers.

Creative Twists and Pairings for Your Dessert
One of the joys of home cooking is the freedom to get creative and personalize a recipe. This No-Bake Banana Split Dessert is wonderfully adaptable. Feel free to experiment with different flavors and ingredients to make it uniquely yours.
My Creative Touch:
Crust Combinations: Instead of graham cracker crumbs, try vanilla wafer crumbs or crushed Oreo cookies. Oreo crumbs create a striking dark contrast and a chocolatey base. You can also add a pinch of cinnamon to your graham cracker crust for a warm, spicy note. Experiment with different cookie types.
Topping Extravaganza: Beyond the classic chocolate syrup, consider caramel sauce or a homemade hot fudge. Sprinkle shredded coconut alongside the nuts for a tropical flair. A dollop of extra whipped cream with mini chocolate chips adds even more indulgence. Get playful with your toppings.
Gourmet Pairings:
Drink Delight: Serve this refreshing dessert with a tall glass of freshly brewed iced tea. A sweet tea or a crisp unsweetened black tea provides a lovely balance to the dessert's richness. For a more indulgent pairing, a small glass of cold milk works beautifully too. These beverages cleanse the palate perfectly.
Side Indulgence: While this dessert is a meal in itself, a small scoop of vanilla bean ice cream served alongside adds an extra layer of creamy delight. The cool, smooth ice cream complements the various textures. It elevates the experience for those who desire even more sweetness. A small bowl of mixed berries also offers a refreshing contrast.
Storing Your Delicious Banana Split Dessert
Proper storage ensures your delightful No-Bake Banana Split Dessert remains fresh and enjoyable for days. Follow these tips to keep it at its best.
Storage: Keep the dessert tightly covered with plastic wrap or in an airtight container in the refrigerator. This protects it from absorbing other food odors and keeps the layers moist. It will stay fresh and delicious for up to 3-4 days. Bananas may brown slightly, but the flavor remains wonderful.
Freezing: Freezing this dessert is not recommended due to the fresh fruit and whipped topping. The textures can become watery and icy upon thawing. It is truly best enjoyed fresh from the refrigerator. The delicate layers will not hold up well to freezing.
Reheating: This is a no-bake, chilled dessert, so it should not be reheated. Always serve it cold, straight from the refrigerator. Reheating would melt the delicate cream cheese layer and whipped topping, ruining the texture. It is designed to be a cool, refreshing treat.
Your No-Bake Banana Split Dessert Questions Answered
I know you might have a few questions as you prepare this fantastic dessert. Here are some common inquiries to help you achieve perfect results every single time. I am always here to help you succeed in the kitchen.
Can I prepare this dessert ahead of time for an event?
Absolutely, preparing this dessert ahead is highly recommended. In fact, chilling it overnight yields the best results for firm, distinct layers and enhanced flavors. Just cover it tightly and keep it in the refrigerator. This makes entertaining so much easier.
Why is my pineapple layer watery, even after draining?
The key to preventing a watery pineapple layer is extreme draining. Use a fine-mesh sieve and press down firmly on the crushed pineapple. You can even pat it dry with paper towels. Any residual liquid will seep into your other layers, making the dessert soggy. Be thorough.
Can I use fresh strawberries instead of pie filling?
Yes, you can certainly use fresh mashed sweetened strawberries. Simply mash about 1 cup of fresh strawberries and mix with 1-2 tablespoons of granulated sugar. Let it sit to release juices, then drain any excess liquid. This offers a fresher, less sweet alternative. It is a wonderful option.
And there you have it, friends! A truly irresistible No-Bake Banana Split Dessert, ready to delight your family and friends. This recipe proves that you do not need an oven to create something spectacular. It is all about fresh ingredients, simple steps, and a whole lot of love.
Remember, cooking is an act of joy and connection. Do not worry if every layer is not perfectly straight or if your drizzle is not magazine-worthy. The most important ingredient is the happiness you share around the table. Embrace the process and savor every sweet moment.
I truly hope this recipe brings a little piece of Southern comfort and joy into your home. I would absolutely love to hear about your experience. Please share your delicious creations and any personal touches you add over on CrispFork. Happy cooking, y'all!
Reader Reviews
This was an absolute hit at our family BBQ last weekend! So easy to assemble and everyone loved the layers.
Such a fun and refreshing dessert for the heat! I used my homemade whipped cream and it was even better.
Wow, this is a game-changer for summer gatherings! My kids devoured it in minutes.
A super simple recipe that tastes way more impressive than it is. Perfect for a last-minute sweet craving.
Loved how versatile this is. I added some chopped nuts on top for extra crunch and it was divine!
This no-bake banana split is officially my new go-to summer dessert. It's incredibly satisfying without being heavy.
A fun twist on a classic! It was a little messy to serve, but totally worth it for the delicious flavor.
Leave a Review